Payment Integration (Stripe & FAPI)
Technical Integration with Stripe Payment System: How to Accept Payments from Customers
In order for your clients to purchase access to your AI Expert, you need to connect your BuddyPro instance to your payment system. This allows you to automate sales, subscription and access management.
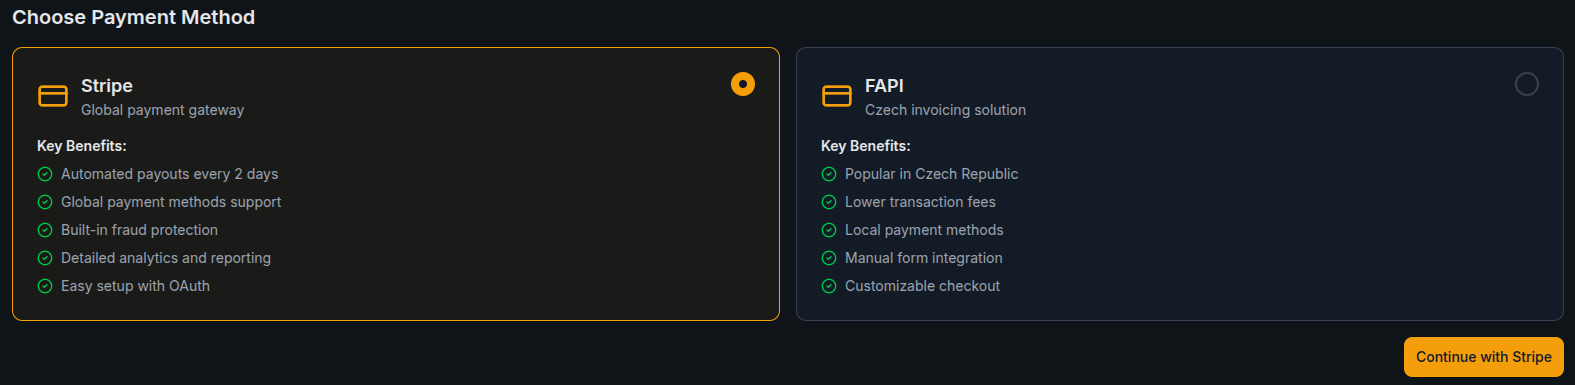
Two payment systems are available -- Czech FAPI.cz and international Stripe.
Decide which system you want to use and continue with either step 18.1 or step 18.2.
Note that it is not possible to use both systems at the same time.
Integration with International Payment System Stripe
If you have decided to use Stripe for payments and not FAPI, follow this guide.
A) Link Your Stripe Account to Your BuddyPro Instance
- In the Dashboard in the Payment Methods section, select the Stripe option and click the Continue button.
- Then you will get to the Stripe Setup page. Click the yellow Connect Stripe account button.
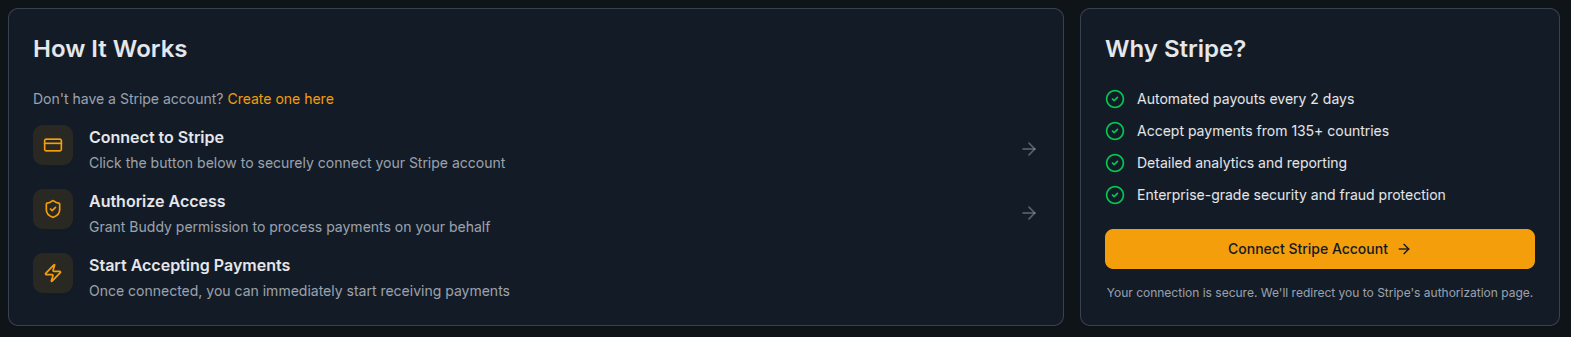
- You will then be taken to the Stripe page where you will create a Stripe account or log in. You will then be automatically redirected back to the Dashboard.
B) Example Buddy Pro Products Will Be Generated
- Buddy will generate 4 products for you, together with example pricing and payment links:
- You can find the generated products here: https://dashboard.stripe.com/products
- You can find the generated payment links here: https://dashboard.stripe.com/payment-links
Managing Pricing Plans in the Dashboard
After connecting Stripe, the Dashboard's Payment Methods section displays your current pricing plans in a table view — showing plan names, prices, message limits, and status. You can also add new plans directly from the Dashboard using the Add Plan button, which opens a dialog where you configure the product details.
C) Adjust the Pricing, Monthly Message Limits and Names of the Products
Adjust the pricing, monthly message limits and names of the products according to your needs. Or create your own products and payment links if needed.
-
If you want to change the price of the example product, you must create a new Price on the product and then create a new payment link, choosing that price.
-
Your Buddy Pro products inside Stripe must always have these metadata fields, which identify them as a Buddy Pro product (already set for the example products):
case: buddy_pro
messages: 200 (any number, up to you) -
The value
messagesis a monthly limit of messages in a conversation (for subscriptions) or how many total messages are granted to the user (for packages). -
Both messages from the user and from Buddy are counted towards the limit.
-
The monthly limit is applied also on annual/quarterly subscriptions to avoid using up too many messages during a single month.
-
Messages bought in a package do not have an expiration date.
-
When you're creating your own product for a package, you need to allow creating a Post-payment invoice in the payment link settings:
- After you've created a product and a payment link, go to the payment link settings, and click edit.
- Go to the After payment tab, enable Create an invoice PDF and click Update link.
D) Additional Commands to Manage Invoices
/processStripePaymentManually:{paidInvoiceId}- This command is used to process the payment manually if automatic processing via webhook fails for some reason. Only use it if your BuddyPro instance or support prompts you to do so.
WARNING ON MANUAL ADJUSTMENTS IN STRIPE: We strongly advise against making manual adjustments in Stripe to automatically issued (especially recurring) invoices to your clients for BuddyPro services (e.g. manually changing the billing period, moving the due date, adjusting the price on an already issued invoice, etc. without a deep understanding of how the integration works and what the implications may be). The BuddyPro platform may not be aware of these manual changes you are making in Stripe and may not sync with them properly, which can lead to issues with activating or deactivating access for the client.
Frequently Asked Questions (FAQ) for Stripe
How is the Buddy Pro subscription or package delivered to the user who buys it?
After the user buys your subscription or package, we automatically send them an activation email from our server with a button to activate their purchase.
If the user is buying from within the Telegram chat with your Buddy Pro, the purchase might be activated automatically without the need to click on the activation email.
What if I want to offer multiple tariffs on one of my web pages?
If a user comes to your signpost from BuddyPro (e.g. after exhausting the trial), it is crucial that the client_reference_id parameter from the original URL is carried over to the Stripe payment links leading from the signpost to the individual Stripe checkouts. For more detailed information on this technical solution, see the Important Configuration for Parameter Transfer on the Plan Selection Page section.
If you are using Stripe (recommended), you can skip this step, this is an alternative to Stripe.
STRIPE ALTERNATIVE:
Integration with Alternative Payment System FAPI (fapi.cz)
FAPI is a robust Czech online sales and billing platform that is currently fully integrated with BuddyPro.
A) Preparation on the FAPI Side (If You Don't Use FAPI Yet)
- Create an account on FAPI: If you don't have one yet, you can register via this link: https://fapi.cz/
- Set up FAPI: Connect FAPI to your payment gateway (e.g. Stripe, Comgate, etc.). This is the standard FAPI setup.
B) Link Your Main FAPI Account to Your BuddyPro Instance
- In the Dashboard in the Payment Methods section, select the FAPI option and click the Continue button.
- Then you will get to the FAPI Setup page. Click the yellow Set up FAPI payment button.
- In
{Username}enter your login name (login/email) to your FAPI account. - In
{API key}enter your API key from FAPI. You can find (or generate) the API key in your FAPI account under My Account > API Keys. - After successfully logging in, your BuddyPro instance is able to communicate with your FAPI account.
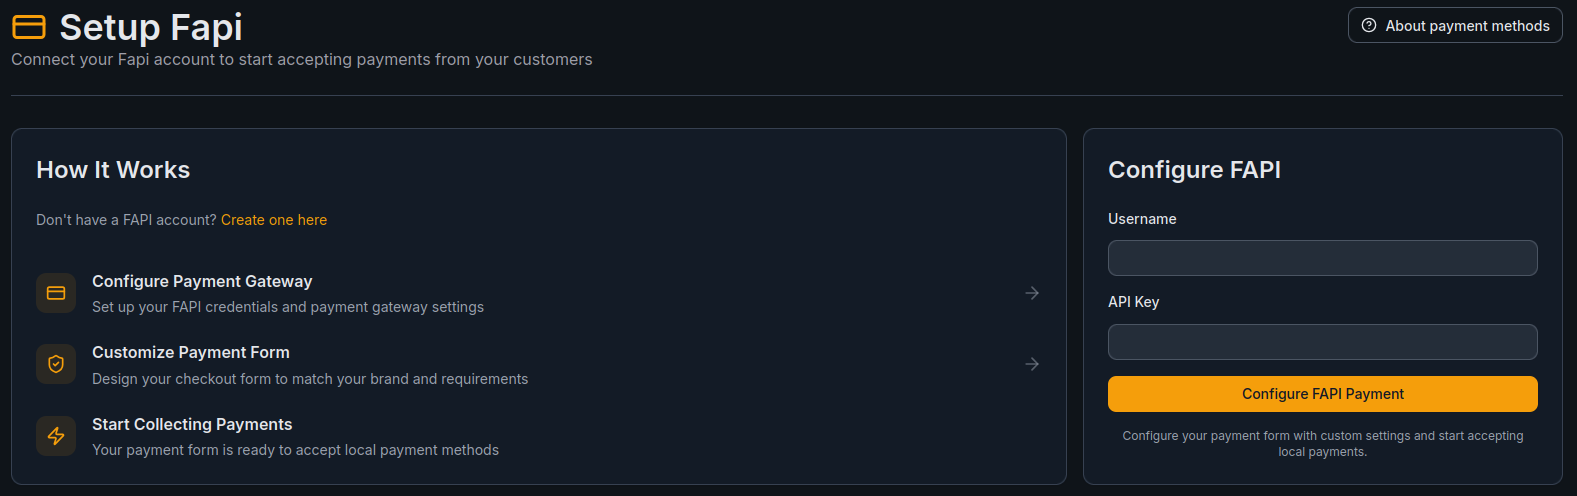
The Setup Fapi page shows:
- How It Works — a 3-step overview: Configure Payment Gateway, Customize Payment Form, Start Collecting Payments
- Configure FAPI — enter your Username and API Key, then click Configure FAPI Payment
If you don't have a FAPI account yet, click the "Create one here" link to register.
After successfully connecting FAPI, the Dashboard's Payment Methods section shows your connection status and pricing plans:
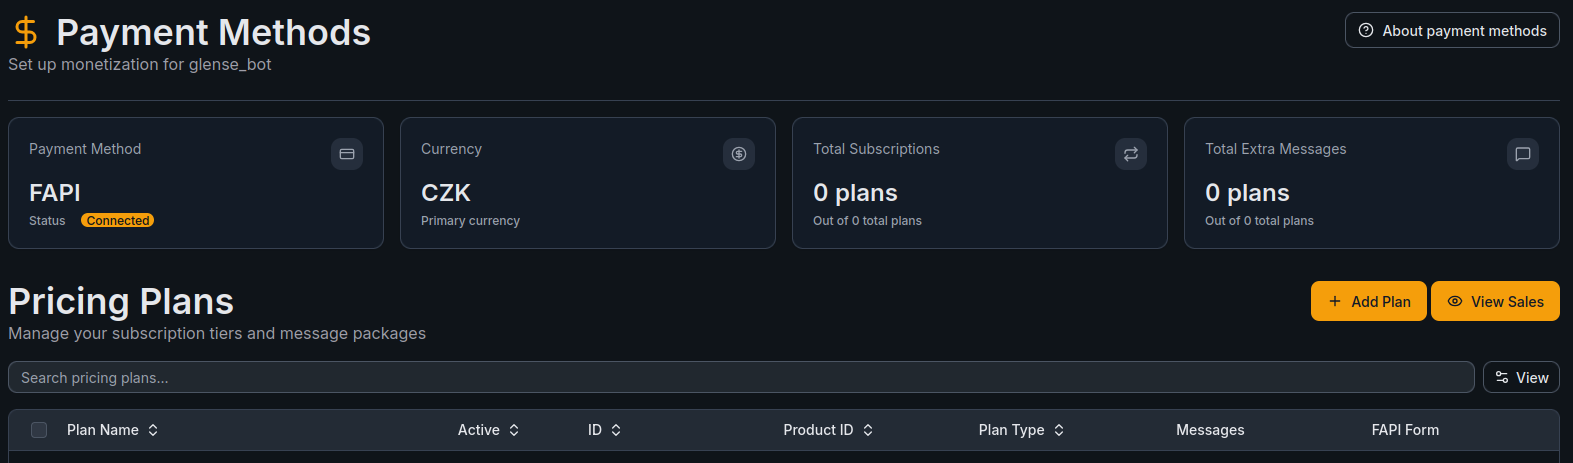
The connected view displays:
- Payment Method — FAPI with status Connected
- Currency — your primary currency (e.g. CZK)
- Total Subscriptions and Total Extra Messages — count of active plans
- Pricing Plans — table of your configured plans with name, status, IDs, plan type, messages, and linked FAPI form
C) Create Products (Items)
- For each of your planned plans (e.g., "AI Expert Monthly Standard", "AI Expert Annual Premium") and for each of your planned extra message packages ("100 Extra Message Package"), you must create a Product in FAPI.
- Create the product in the FAPI section "Sales" -> "Products". Here you define the product name (e.g. "AI Expert Subscription - Monthly") and its price.
D) Create Sales Forms in FAPI
The guide below will walk you through setting up sales forms for subscriptions and one-time packages, step by step.
- For each of your planned plans (e.g., "AI Expert Monthly Standard", "AI Expert Annual Premium") and for each of your planned extra message packages ("100 Extra Message Package"), you must also create a Sales Form in FAPI.
- Create the Sales Form in the FAPI section "Sales" -> "Sales Forms". You then assign the product (item) you created to this form. Here you also set up the payment methods, the texts on the form, etc. Set up the form in the following 6 steps.
- Key settings in FAPI for SUBSCRIPTION products:
- "Issue regular invoices": must be checked.
- "Enable automatic card charge": it is strongly recommended to check it so that the subscription can be automatically renewed.
- Set the correct billing period (monthly, yearly, etc.).
- These options can be configured in Step 3 of the Sales Form settings.
E) Link a Specific FAPI Sales Form to a Specific Plan/Package in Your BuddyPro Instance
- For each individual FAPI sales form you have created (i.e., each tariff and each report package), you must link the form in the Dashboard:
- After successfully connecting FAPI, go to the Dashboard in the Payment Methods section and click the yellow Add Plan button.
- A window for Create FAPI Form will appear:
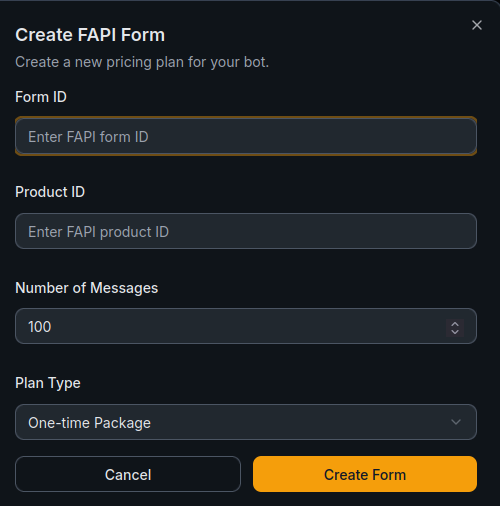
- Form ID — the ID of your FAPI form (find it in the URL when editing your form in FAPI, e.g.
https://web.fapi.cz/forms/preview/12345→12345) - Product ID — the product (item) ID in FAPI (find it under "Templates" → "Items")
- Number of Messages — the number of messages the user receives with this plan (e.g.
100) - Plan Type — select
One-time Packagefor message packs orSubscriptionfor recurring plans - Click Create Form to save.
After creating, BuddyPro will verify the existence of the form and product in your FAPI and save this connection. The response will also display information that you need to properly configure the thank you page and email in FAPI (see the following key point).
- Form ID: In the FAPI administration, open your form. The ID is in the browser URL:
https://web.fapi.cz/forms/preview/12345— the number at the end (12345) is the form ID. - Product ID: In the FAPI administration, go to "Templates" → "Items". The product ID is shown in the list of your created products.
F) Additional Commands to Manage Already Connected FAPI Forms (Enter into Your BuddyPro Instance)
/getFormMessages:{form_id}-- Shows you the maximum number of messages currently set for a FAPI form with the given{form_id}./updateFormMessages:{form_id}:{new_message_count}-- Allows you to change the maximum number of messages for an already linked FAPI form. Important: This change will only take effect for new users who purchase a product through this form after this change has been made. It will not affect message limits for existing users who purchased the product previously with the original settings./processFapiPaymentManually:{paidInvoiceNumber}-- This command is used to process the payment manually if automatic processing via webhook fails for some reason. Only use it if your BuddyPro instance or support prompts you to do so.
WARNING ON MANUAL ADJUSTMENTS IN FAPI: We strongly advise against making manual adjustments in FAPI to automatically issued (especially recurring) invoices to your clients for BuddyPro services (e.g. manually changing the billing period, moving the due date, adjusting the price on an already issued invoice, etc. without a deep understanding of how the integration works and what the implications may be). The BuddyPro platform may not be aware of these manual changes you are making in FAPI and may not sync with them properly, which can lead to issues with activating or deactivating access for the client. Always try to manage tariffs and payments primarily through the standard FAPI interface and connection commands in BuddyPro.
Selling a Subscription at a Discounted Price in the First Period
This model means that the customer gets a lower price only for a certain introductory period (e.g. 14 days, first month, three months or half a year). After this promotional phase ends, the subscription automatically continues at the regular price.
Typical scenarios:
- First month for 1 EUR, then at full price for each subsequent period.
- First payment for 6 months, then switches to recurring monthly payments.
Selling Buddy as an Optional Item or Upsell in FAPI
You can sell Buddy in FAPI as an optional item or upsell to another product (for example to a course or program).
The form settings in this case differ from a regular subscription where buddy is a mandatory item:
- ❌ the activation link is not placed on the thank you page or in the email upon order payment
- ✅ the activation link is instead placed in the email that is sent after the item is paid for the Buddy subscription
We do not yet support selling Buddy as a mini upsell.
Detailed procedures can be found in the videos.
Even in these cases, the Buddy subscription can be set at a better price for the first period with subsequent recurring payments at a different price -- just create two items for this subscription and in step 3 of the form settings replace the first subscription item at the advantageous price with the second item at full price.
Frequently Asked Questions (FAQ) for FAPI Connection
Why is it necessary to have a separate FAPI sales form for each tariff or message package?
The /connectForm command allows you to link only one specific FAPI form to one specific message count setting and product type (subscription/package) in BuddyPro at any given time. Therefore, to function properly and distinguish what the client is buying, it is necessary to have a separate form for each plan offered.
What if I accidentally enter the wrong number of messages when Adding a Plan?
Simply re-enter the /connectForm command with the correct information. The new link will overwrite the previous one for that form ID. Always check carefully to make sure you are using the correct IDs.
Do I need to put the activation link on the FAPI thank you page AND in the FAPI confirmation email?
Yes, this is very strongly recommended. This will give the user two options to activate access and minimize the risk of the link being overlooked or lost.
Does any variable other than {invoiceNumber} work in the activation link for FAPI?
No, in order for the FAPI link to work properly, the activation link must contain a placeholder exactly in the format {invoiceNumber}.
What if I want to offer multiple tariffs on one of my web pages (plan selection page)?
If a user comes to your plan selection page from BuddyPro (e.g. after exhausting the trial), it is crucial that the userId parameter from the original URL is carried over to the links leading from the plan selection page to the individual FAPI forms. For more detailed information on this technical solution, see the Important Configuration for Parameter Transfer on the Plan Selection Page section.
Where exactly do I find the form ID and product ID in FAPI?
- Form ID: In the FAPI administration, go to the "Forms" section. In the list of your forms or when editing a specific form, you will see the form ID in the browser URL (e.g.
https://web.fapi.cz/forms/view/XXXXX, where XXXXX is the ID). - Product ID (Items): In the FAPI administration, go to "Templates" -> "Items". In the list of your products (items) you will see their ID.
Can I connect multiple FAPI accounts?
The /setupFapi command links one FAPI account to your BuddyPro instance. If you need to connect a different FAPI account, you can run the /setupFapi command again with the new credentials. The new connection will replace the previous one. Each BuddyPro instance supports one active FAPI connection at a time.
Selling Through Other Platforms (Kajabi, Teachable, etc.)
If you sell your products through a platform other than Stripe or FAPI (e.g. Kajabi, Teachable, Thinkific, etc.), you can build your own custom integration using Zapier webhooks.
Many of these platforms support Zapier natively — for example, Kajabi has a built-in Zapier webhook, making the integration straightforward.
BuddyPro provides its own Zapier actions for generating invite links and managing access. You can use them via the public Zapier integration: BuddyPro Zapier Actions
This allows you to automate the full flow: when a customer purchases on your platform, Zapier triggers BuddyPro to generate an invite and activate access — no manual steps needed.
If you need help setting up a custom Zapier integration, reach out to BuddyPro support.